Gear, Packing, and Flying with Photography Equipment
I had two reasons for going on this cruse, first, to spend time with my wife, and second to photograph Alaska as best I could given the time and location constraints of a cruise. When I think of Alaska, I think of mountains, snow, wildlife, and rugged terrain. The parts of Alaska that our NCL cruise took us on was largely a part of Tongass National Forest, America’s largest temperate rainforest. Because many ports are part of the temperate rainforest, rain in the summer months should be expected and planned for. Our trip, as it happened, was somewhat unusual as we saw high temperatures and little rain. We did have some light rain in Hoona, AK but other than that, the weather remained unusually dry and sunny.
In the lengthy post below, I talk about photography equipment, vital things to consider when flying with such equipment, men’s clothing for this type of cruise, and a little more. It should not be a surprise that a vast portion of this content is photography related, so if you are only interested in clothing ideas, you’ll need to scroll most of the way down.
Photography Equipment
My discussion of photography gear here is descriptive not prescriptive. As I've mentioned elsewhere, gear does matter, but it’s a means to an end, not the end itself. The specific camera bodies and lenses listed are not what's important. I had specific photography goals and budget, and I packed accordingly. If you are looking for a list of the best of the best, you’ll need to look elsewhere. If you are looking for good, functional equipment, purchased at reasonable prices and for specific purposes, this post might be of interest to you.
Camera Bodies
Since one my goals on this cruise was to photograph Alaska, I didn’t want to end up in a situation where I didn’t have a working camera. To this end, I brought two camera bodies, the Nikon D780 as my primary, and a Nikon D3400 as my backup. I’m not the guy with cases full of camera bodies, so I brought what I had. Situations like this are good reasons to pick a photography ecosystem and stick with it. Since both camera bodies support Nikon F-mount lenses, I didn’t have to bring two sets of lenses. The D780 is weather-sealed, the D3400 is not.
Lenses
Speaking of lenses, the choice of lens to bring should be based on what you intend to shoot and the conditions you intend to shoot in. Since possible subjects include landscapes, wildlife, and everything in between, I wanted both wide and telephoto options. Since there was a real possibility of shooting inclement weather, I needed gear to be somewhat weather-sealed. The other thing to consider is budget. I don’t have the range of lenses mentioned above, but I also didn’t want to break the bank by purchasing a lens that I’ve never used and may only have occasional use for. OK, so what did I end up bringing? The two lenses I used the most were a 24-70mm that I own, and a 200-500mm, I rented from Lensrentals.com. I would agree that the 24-70mm is not ideal for landscape, but it does give me a 24mm option at the wide end, and the 200-500mm isn’t idea for wildlife because it is a f/5.6 max aperture, but I was balancing intended use, ease of transport, and budget. As you can see, those two lenses don’t cover anything in the 70-200mm range. I would have loved to also rent a 70-200mm, but it considering other items that needed purchasing, it just wasn’t in the budget. Ironically, 70-200mm was the range I found myself needing the most. Maybe that’s just because I didn’t have it, but 70mm was often didn’t provide the reach I wanted and 200 was too much. I did also bring my 85mm, but it saw only limited use because, while it is a fantastic lens, it is not weather-sealed. Thankfully, by using the 24-70mm on my D3400, a crop-sensor camera, it performed like a 36mm-105mm. So, by being creative, I could cover half of the 70 to 200 mm range.
Regarding the Nikon 200-500mm f/5.6E ED AF-S VR, I have mixed feelings. There are several shots (see my Alaska gallery) that I would have missed without it. However, most of the time, it was too much reach and not usable. It is also relatively heavy, and required special gear to carry it around on excursions because it would not fit in most photography backpacks when it was attached to the camera. When I needed it, I was glad I had it. I rented it specifically for a whale-watching excursion in Juneau and was glad I did. When I needed it and didn’t have it with me, I couldn’t stop kicking myself for leaving it behind (see my post on Ketchikan). But the majority of the time, what I wanted was a 70-200mm, and likely 200mm in Ketchikan may have been sufficient. Renting from Lensrentals.com was a great experience, and I would not hesitate to rent from them again. Renting enabled me to use this telephoto on the trip and it also helped me realize, that it is not a lens I will spend money on buying; I just don’t have the need for it.
Note, if you are thinking about bringing a long lens on a helicopter excursion, think again and check the restrictions about what a passenger is allowed to carry with them.
Beyond Camera Bodies and Lenses
Now that we have camera bodies and lenses out of the way, it is important to discuss all the other related items that are required to support those choices. Namely
batteries
battery chargers
power banks and related cables
photo cards for your camera
backup photo cards in case one fails on you (I’ve had it happen)
weather-sealed case for your camera cards
Two ways to back up your photos so you don’t lose them
Cleaning supplies in case you need to do some maintenance due to the weather
Batteries, Chargers, and Power Banks
For each camera, I brought two batteries and appropriate chargers. Unfortunately, my camera bodies use two different battery types so I ended up bringing 4 batteries instead of 3. Since I’m shooting with DSLRs, I can get away with a minimal number of batteries. If you are shooting with mirrorless cameras, you may need to bring twice that many. Every evening, I made sure to charge everything overnight, so I would be fully prepped for the next day. This can be a challenge on cruise ships since they typically have few power outlets, but before bringing power strips and surge protectors onboard, check the restrictions for your cruise line and specific ship. Also, don’t try and sneak something onboard. First, you’re putting the lives of everyone onboard at risk, don’t be that selfish. Second, the cruise security checks will scan your bags just like they do at the airport, and restricted items will be confiscated. We checked, double-checked, and triple-checked NCL restrictions, and at the time of our cruise, non-surge type power strips are allowed onboard as long as they are not plugged in while you are not in your room. An inexpensive 6-outlet power strip from BestBuy served the purpose just fine - no need to buy an overpriced “cruise ship essentials” kit from Amazon.
Since I like having backups of backups (within reason), I also brought a power bank/battery pack with me. I was previously given one as a gift, so no purchase required. The model I have, and that works really well for me is the Baseus 65W 20000mAh USB C 4-Port PD3.0 Power Bank. It holds full charge for months when not in use and can charge smart phones (Mac and Android), laptops (Mac and PC), my D780 (when turned off), and can easily be used in conjunction with a dummy battery to power either of my cameras for hours when shooting video. It also has a handy LCD to display the power level, and more.
SD Cards
Both my DSLRs take SDXC cards so I was able to buy an interchangeable set to go in both cameras and to serve as backup. I already had one card, so I bought 3 more. Why 3? My D780 supports 2 cards and can be configured to write to both cards simultaneously. In this configuration, the second card serves as an internal backup in case the primary card fails. My D3400, on the other hand, only supports a single card. If it fails, it fails, but I still wanted a backup in case any one card failed. To summarize, I had a total of four cards, two in the D780, one in the D3400, and a spare. Even though SD cards are less expensive than CF Express cards, they still can be expensive when you are buying more than one and trying to balance other expenses. The card I already had is a Sandisk, and it is a replacement for another Sandisk SD card that failed in the middle of shooting a corporate event. Luckily it failed right before lunch. I was able to get the photos off of it and run out and buy another one. Because of this failure, and because I’m trying to make the best use of the available budget, I searched for other options. At that time, B&H Photo, Video, and Audio had Sabrent 128GB USH-II SDXC V60 U3 Class 10 cards at a ridiculously low price of $29.99. Sabrent is a well-known and respected memory brand, so I had no hesitation ordering these for half the price of Sandisk cards. These cards have worked flawlessly so far and I’m happy with the purchase. To protect my cards when they are not in a camera, I purchased an inexpensive weather-sealed 12 SD card hardcase. Yes, 12 is more than enough, but it was the best deal at under $11. It is small, lightweight, weather-sealed, and I now always have it with me.
Photo Backup Plan
I took thousands of photos on this trip, and even at 128 GB of card-space, a single card would not have held all my photos. One option would have been to buy more cards, but that gets expensive and does not provide enough of a backup for me. Since I wanted two copies of all my photos (I shoot RAW + JPEG so there are two photos for each press of the shutter), I purchased a 1 TB portable SSD (solid state drive). The exact make and model is the 1TB Samsung T7 Shield. This requires a computer to use, so I also packed a laptop we already owned. The plan was that every evening before retiring to bed, I would backup my SD card to the laptop with a SD to USB-C adaptor, then copy the photos from the laptop to the SSD. This gives me a copy all my photos on the laptop and another on the SSD and I did not have to worry about filling up my SD cards, and I also didn’t have to worry about SD card failure.
I said this was “the plan” for good reason. In spite of all my efforts, I made a rookie mistake. Before leaving, I tested the T7 SSD on my Windows PC and stupidly put it in password-protected mode. The laptop I brought was a MacBook Pro M1, and I assumed since the T7 info said it was compatible with PC and Mac, that I did not need to test it first. The first night on the ship, I backed up my photos from the SD card to the laptop as planned, then plugged in my T7, and to my chagrin, it is not compatible with the M1 when in password-protected mode, leaving me with an unusable SSD until I got home, plugged it back into my PC, and turned off the protected mode.
Another little warning here. If you are hoping to back your files up over the Internet, it won’t work. At least it didn’t work for us. The WI-FI on the ship was useless, and even if it worked, which it almost never did, the usage limits would cap-out well before most of the photos were backed up.
Cleaning Gear
The least interesting but necessary part of this packing list is cleaning gear. So not to boar you, I’ll make this quick:
Rocket blower for blowing dust off your lenses and camera sensor (Please do not blow directly in your camera. You’ll get more than air on your sensor!)
Mico-fiber clothes
Lens wipes
small nylon brush
I left my other cleaning gear at home. If one sensor became problematic, I had a backup camera.
Tech Bag
Now that I had all these batteries, chargers, power banks, cables, SD Cards, power adapters, and more, I needed a way to organize it all into a compact and transportable space. After some research, I stumbled upon the “Tech Bag,” a cousin to the toiletry bag, but for technology (obviously). As with everything else technology and photography related, there are a mirid of options at astronomically different price points. In the end, I went with the DDgro Tech Organizer Pouch, a knock-off of Peak Design’s Tech Pouch V2. Yes, you can berate me for buying knock offs but I had a budget to stick to. The DDgro pouch is well constructed, provides organized storage for all or mostly all of my stuff, and continues to work extremely well for my needs, at, you guessed it, half the price of the Peak Design option.
I’ll get more into this a little later on, but this tech bag is part of a larger plan to deal with the unknowns of traveling with a lot of expensive-to-me photo gear. And it paid off on the very first flight!
Tripod / Monopod
I only used my tripod in a couple of situations, hand-holding for everything else. The tripod was used for landscape photography and when attempting to shoot photos of the Hubard Glacier from the deck of the ship while being pummeled by wind, sleet, and rain. My tripod is the K&F Concept 78-inch Tripod, that can be converted to a monopod. It is made from aluminum, well constructed, and serves my day-to-day needs. It is a solid choice for everyday use and, when I bought mine, it cost less than $80. The included Arca Swiss ball-head is very functional for the price point but if you need multidimensional precision to the millimeter, you might want to look elsewhere. This tripod is light-weight (3.17 lbs), compact (19.3 inches long when folded for travel), sufficiently tall for my height (it is 78-inches when fully extended), and sturdy. I’m not sure you can find a better tripod for under $100 anywhere.
Backpack and ICU - Bringing it all together
Honestly, the choice of backpack and ICU was the hardest decision, primarily because of the cost. Sticking the word “photography” in front of anything will automatically double or triple the price. This is especially true for backpacks. Knowing this tendency to inflate prices, my goals were “simple.” I needed a pack that
was weather-resistant
had a compatible rain cover
had a functional waist strap
had comfortable shoulder straps
could hold the required equipment, including two camera bodies, three lenses (with the 200-500mm lens attached to one body)
comply with airline standards for a carry-on (there is no way on earth I’m checking my camera gear!)
carry a small number of other items such as light-weight jackets, water bottles, snacks, my tech bag, and umbrella, and other odds and ends.
And, of course, I wanted all of this for as little as possible. Simple, right?
To try and save money, I originally tried to “build my own” by assembling various bits and bobs, but ended up sending everything back as it just didn’t work.
Flying with Photography Equipment
Before I go any further, I think it is important to talk about another aspect of packing photography gear when flying. This is vital, will explain the reasoning for my final decisions, and not something I thought about but came across in my research for this trip, namely, the need to quickly adapt when you are told that your backpack full of expensive photo gear will not fit in the overhead compartment and you are forced to check it. I cannot stress the importance of this enough as this is exactly what happened to me on one leg of our flight to Anchorage, Alaska. If it wasn't for the fantastic advice of Mark Denney, in his video titled, Photographers! This Loophole Will Calm Your Worst Air Travel Nightmare! I would have been left standing in front of the jetway, scratching my head, not knowing what to do. The click-bait title aside, the advice given in this video became the driving force behind my final packing solution and actually saved my butt.
If you are interested in how to safely fly with photo gear, go watch Mark’s video, but here is the quick summary:
Never check any gear that, if damaged or did not make it to your final destination, would ruin the purpose of your trip.
In the rare, but very real chance, that you are not allowed to bring your carry-on full of equipment on the plane, you need to pivot quickly so that you can still bring all the gear on board, but still gate-check your carry-on.
So, what is the solution?
In short, every passenger is allowed two items on the plane, a carry-on, and a personal item. So, when packing your carry-on backpack, you need to compartmentalize. Inside your backpack, your photography equipment needs to be in a removeable ICU. If needed, the ICU can become your carry-on. Other essential items in your backpack are also in their own easily removeable containers so they can be removed from your backpack and placed inside your personal item. Then, any non-essential items in your personal item, can be put into your backpack, and you can now gate-check a backpack full of non-essentials, and all your photography equipment stays with you.
I followed his advice, given my own budget and equipment needs, and, as I have already mentioned, this exact “rare” scenario happened to me on our way to Anchorage.
My Final Solution
f-stop Mountain Series Ajna Backpack (Anthracite Matte Black, 40L)
On-hand laptop messenger bag that I’ve had for years
The afore mentioned DDgro Tech Organizer Pouch
Admittedly, the f-stop gear was more than I wanted to spend but it was also the best and cheapest solution I could find that also fit all my needs. However, I did find the backpack at 33% off, and that was the only way this worked. And, due to the cost, I made sacrifices elsewhere.
Here is how it all ended up working after I was told the overhead compartments where very small and were not large enough to hold carry-on luggage on the larger end of the spectrum, like my backpack (on this flight, almost every passenger was told to gate-check their carry-on):
Original Packing Orientation
Carry-on (backpack)
ICU with all my photography gear (camera bodies, lenses, and accessories)
Tech bag with all my batteries, chargers, cables, power adaptors, portable T7 SSD, and more
Laptop computer, stored in the unused H2O pouch in the inner compartment.
compactable rain jacket
rain cover for the backpack
other non-essentials
Personal item (messenger bag)
umbrella
fleece zip-up jacket
A change of clothes in case my checked luggage did not make it on time.
travel water bottle (filled after going through security)
other non-essentials
Checked luggage
tripod, and a few other non-essential photography items
The remainder of my clothes, shoes, toiletries, etc.
Alternate Packing Orientation
Carry-on (ICU)
All my photography gear (camera bodies, lenses, and accessories). ICU is padded, closes firmly with a zipper, and has a carrying handle.
Personal Item (messenger bag)
Tech bag with all my batteries, chargers, cables, power adaptors, portable T7 SSD, and more
Laptop computer, stored in the padded laptop sleeve.
umbrella
travel water bottle
fewer non-essentials
Backpack (gate-checked)
fleece zip-up jacket
A change of clothes in case my checked luggage did not make it on time.
compactable rain jacket
rain cover for the backpack
most of my non-essentials
Checked luggage
unchanged, because, you know, it was checked, and hopefully in the belly of the plane.
Once again, I cannot thank Mark Denny enough for his excellent video!
f-stop Mountain Series Ajna Backpack
OK, so jumping back to the backpack for a little more discussion. The Mountain Series Ajna is not f-stop’s current backpack, and not everyone’s favorite. If you look for reviews online, the majority of them seem to be by people who have never actually used the pack, and appear to be mostly unboxing type reviews, which really aren’t very useful. Many of the reviews all say the same thing, and most people gloss over important details and even those that did have experience with the pack, didn’t really understand how to use it properly. One of the big reasons for this, is that even on f-stop’s own website, info on this pack is severely lacking.
Some common complaints about this pack involve how to carry a tripod, and the lack of a water bottler holder. Both of these comments are somewhat misplaced and show a general lack of knowledge about how this pack works. Granted, it wasn’t obvious to me either, and I had to spend more time than I should to figure it all out, a problem that could have easily been avoided if f-stop posted clear information and instructions. The fact is, this is a great backpack, once you understand it.
Internal Camera Unit (ICU)
Before I talk about making the pack work with tripods and water bottles, it is important to understand that these packs are basically empty shells, and the expectation is that you are using an f-stop ICU of one size or another with the pack. Each of their packs come with a list of recommended and compatible ICUs. For this 40-liter pack, the f-stop Large Pro ICU is listed as compatible, and it is. The reason it is compatible and not recommended is because of its size compared to the pack. The Large Pro ICU takes up 3/4 of the pack’s capacity, if not more. However, if you remember, one of my requirements was that I needed a solution that would carry the 200-500mm lens attached to one of my camera bodies. Amazingly enough, the interior height of the ICU was the exact length of the 200-500mm lens attached to the D780. This configuration enabled me to carry all my camera gear in the ICU, with room enough at the top of the pack for my Tech pouch and rain jacket, with enough additional accessory pockets for everything I needed. In other words, it was exactly what I needed. No more, no less.
Carrying a Tripod
The proper way to carry a tripod is not to unzip one of the side pockets and stick a tripod leg into it, I don’t care how many people tell you it is. The key to making this work as designed is to purchase the f-stop Gatekeeper Straps mentioned above. A set of these cost around $18 USD and are honestly required, so I can understand everyone’s confusion. These are fantastic heavy-duty straps and should have been included with the pack. If you can manage it, two sets would be ideal. Unfortunately, these also have no useful documentation. So, in simple terms, here is how they work.
On both the top and bottom of the pack are four utility loops. These loops are specifically designed for attaching the Gatekeeper straps. If you want to carry your tripod on the bottom of that pack as is the usual practice, one end of one strap should be attached to the right-hand side front loop on the bottom of the pack, and the other end of the strap should be attached to the right-hand side back loop on the bottom of the pack. Now, using the second strap, follow the same pattern for the left-hand side on the bottom of the pack. There, you’re done. If your goal is to carry a bed roll or rolled heavy jack on the top (like I did), simply use the straps as outlined above, but use the top utility loops instead of the bottom ones. If you need to carry something on the top and bottom, use two sets of straps. Top of the pack or bottom of the pack, they work the same. It really is that simple. No weird or awkward tripod position needed.
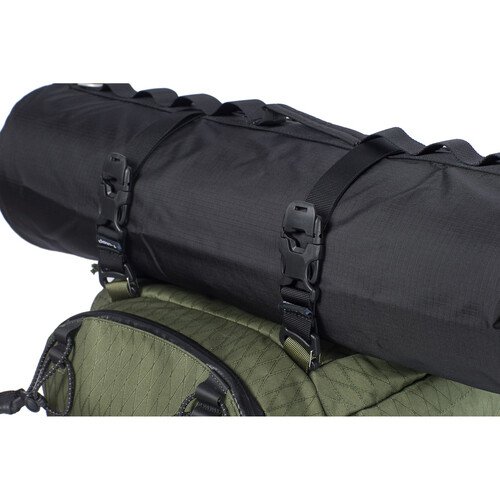
Photo from the f-stop Gatekeeper webpage on B&H’s website.
Carrying a Water Bottle
Yes, it is true, there isn’t a built-in water bottle pouch but the Molle loops on the waist belt provide an easy way to attach one, and they’re very inexpensive. I was able to find this water bottle holder and pouch set on Amazon for around $12. They are well made, and when used together, they were perfect for holding my water bottle, binoculars, and more.
Rain Cover
So, if I had a complaint about the pack, is that you had to buy a few extra accessories to make it work perfectly. In the same vein, you also have to spend extra money to get the fitted rain cover. Again, like the Gatekeeper Straps, this should have been included. The rain cover was $20. So, for $50 more total in accessories, the pack works like a charm and covers all my needs.
Other Accessories
Another accessory that I use regularly is the Peak Design Capture Camera Clip V3. This clip and Arca Swiss mount plate combo allow me to carry my camera on the shoulder strap of my pack or on my belt, and easily transition it to my Arca Swiss ball head on the tripod. It is milled from a single billet of aircraft-grade aluminum and holds a camera safely. I don’t know that I would use it for a camera with an attached 200-500mm lens, but it works great for cameras with normal lenses.
When not using the Capture Camera Clip to carry my camera, I use Peak Design’s Leash Camera Strap. It is slim, lightweight, and the quick-release system enables me to attach and un-attach it easily. This is a much better solution than the camera straps that come with most cameras.
One last accessory that is handy, is the Speed Stach from Matador. It attaches to the shoulder strap of you pack and provides quick access to your phone and other smaller items.
Well, that is the end to my ramblings on photography gear for our cruise. Obviously, if you have different goals or budget, what photography gear you bring will be different. If you choose to bring a backpack full of gear with you on your excursions, you may want to keep a few things in mind, and I cover those in my Photography on a Cruise blog post.
Clothes
If you’ve ready any of my other Alaska cruise posts, you’ll know that I typically do not like cold weather. However, I’m also realizing that is likely because I never had the appropriate clothing. Being a child of a south Texas family living on simple means, heat was the norm, and our holidays consisted of visiting family, not skying. Even though our tour date was in June, everything we read about how to dress said to dress in layers and plan for temperatures between 30 and 90 degrees. Also, depending on the excursions you opt to take, you may need to plan for colder temperatures or harsh, bitter wind.
In the end, here was what I packed for our trip. I don’t regret bringing any of it and used all of it. If you are acclimated to cold weather, you’ll likely laugh at my list, but everyone should bring what makes sense for them, their usual climate, and comfort level.
A base layer like RedHed’s lightweight long sleeve tops and bottoms
A couple of pair of lightweight quick-drying hiking pants. I ordered a pair from Amazon and also bought a pair of Ascend Hiking Pants from Cabela’s, they both worked well, but I liked the Ascend pants better. I wore these with the base layer on days we would be doing lots of walking or hiking and found this combination to be much more comfortable than blue jeans.
A pair of waterproof fleece-lined pants. I ordered these from Amazon: TBMPOY Men's Waterproof Fleece Lined Pants. These, in combination with the base layer, worked extremely well under the coldest and windiest conditions (i.e., my legs never felt cold).
A couple of lightweight, quick-drying, long sleeve hiking shirts. I ordered a couple of shirts from Amazon, and while they work, they are styled for men with smaller waists and larger chests and arms, so, unfortunately, they did not fit me as I would have liked. Regardless, they served their purpose, and when used with the base layer, worked as desired.
A zip-up fleece jacket. I bought mine from Columbia. I wore this jacket a great deal most of the trip and have zero complaints.
A zip-up, lightweight rain jacket. I also bought mine from Columbia. The entire jacket can compress into the left pocket which makes it perfect for travel. I always had this with me on excursion days and needed it more than once.
A fleece beanie to keep my head and ears warm. I purchased the RedHead Performance Stretch Beanie for Men from Cabela’s. I also used this often when on deck or whale watching. It kept the wind and cold off without the need to put on a jacket with a hood.
A fleece-lined, hooded heavy winter jacket. I bought one a few years ago and it continues to suit my needs.
Layered gloves. I discovered this trick from a photographer I follow on YouTube. He does a lot of landscape and adventure photography. The pair he recommends are much more than I need, and Cabela’s had a less expensive version that perfectly fit my needs. The inner layer is a wind-resistant layer that also allows you to use your touch sensitive devices, like phones or cameras, the outer layer slides over the inner layer for harsher conditions.
Wool socks. Cabela’s had some inexpensive options and they kept me feet warm and dry.
Waterproof shoes/boots. I have always liked Merrell’s. I know there are newer and more expensive options with better waterproofing, but the Merrell Moab 2 Waterproof Hiking Boot worked great for me.
At least one set of nice clothes for any special dinners you’ve planned.
Other Items
Travel wallet. I never carry a traditional wallet when traveling. There are just too many opportunities to lose it or have it stolen. And, since this cruise stops in Vancouver, CAN, it requires that each passenger have a valid passport. I needed something that easily held cards, cash, IDs, and my passport, and the Venture 4th RFID Blocking Travel Neck Wallet for Men & Women I purchased from Amazon did exactly that. I despise the travel belts that require you to stick your hand down the front of your pants to access your secure items, so this was a more acceptable option for me.
Toiletries bag. I’ve used the same one for decades and it continues to cover my needs.
Motion sickness medicine. Here is where I had an epiphany. I’ve been using the same motion sickness medicine all my life with little to no success, so I just thought it was me. Then, when researching for this trip I saw several people mention Bonine, which I had never heard of before. I also saw multiple mentions of patches, and still more mentioning using the two together. I was already committed to going, so I had nothing to lose. The result? I’m still up in the air about the patches. I never used them on their own, but even with one Bonine, I still had issues. However, taking two Bonine (also with up to three patches), I felt great with little to no symptoms whatsoever! This is literally life changing for me, and I am no longer resistant to water-based activities like I have been for decades. Bonine is a Godsend!
This ended up being a very long blog post, but I hope it provided some benefit to you. I like to research and I likely over researched this trip, but I also feel it was worth the time because I never felt like I was unprepared or underprepared. Very few items remained unused and almost everything I brought was used at least once for its intended purpose, and all of it fit in one carry-on, one personal item, and one 24-inch suitcase.
The only item we bought for this trip that we really regretted was a pair of walkie talkies. These simply never worked, and we ended up leaving them in the suitcase and have not touched them since. The Midland T51VP3 X-TALKER Long Range - FRS Two Way Radios are worthless on a ship full of metal. Seriously, don’t bother. They are a complete waste of money.
If you would like to see my other posts related to our Alaskan cruise, see Cruising Alaska with Norwegian Cruise Line.